Snapshots in Wink Reports allow you to save a dataset or report at a specific point in time. They help preserve historical data, track performance, and can even be used as a data source for other reports, making your reporting process more flexible a
1. In the left panel, locate the camera icon and hover over it to reveal a dropdown menu. Select Schedules from the options. Next, click on the + New Schedule button in the top-right corner to add a snapshot schedule.
Fill in the details as follows. The click “Create Schedule”
Name: This represents the name of the Snapshot Report.
Folder: Select the folder where the snapshot will be saved.
Report: Choose the report you would like to take a snapshot of

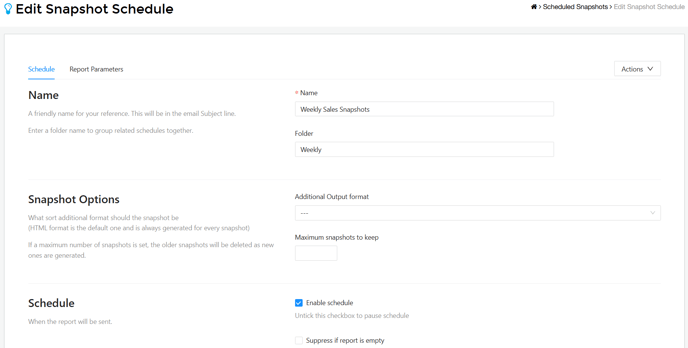
2. You will be redirected to the "Edit Snapshot Schedule" page, where you need to fill out the following options:

Additional Output Format: Select the additional format for the snapshot. The default format is HTML, which is always generated for every snapshot.
Maximum Snapshots to Keep: Set the maximum number of snapshots to retain. Older snapshots will be deleted as new ones are generated.
Enable Schedule: Tick this box to activate the schedule. Unticking it will pause the snapshot schedule.
Schedule Frequency: Choose when the snapshot will be taken. Options include Daily, Weekly, Monthly, Quarterly, or a set number of days between each repeat.
Time of the Day: Select the time of day for the snapshot to commence. Note: The snapshot will follow the timezone of the user who created the schedule.
Start Date: Set the date when the snapshot will start capturing.
Number of Days Between Each Repeat: Choose how many days apart each snapshot will be generated. For example, if you select “14 days,” the report will be generated at 8 AM every 14 days, starting from the chosen start date.
Created By: Select the user who owns the schedule. Note that the selected user's timezone will determine when the schedule is executed, and their region settings will be applied when generating the report
4. When done, Just click the “Save” button below.
Notes:
- To test the snapshot: You can click the “Save and test” button below.
- You can add filters, such as a date range, under the Report Parameters tab.
